Looking forward to meeting the other teams, and hope it doesn't rain!
Sunday, October 31, 2010
MAGIC 2010 - Adelaide
Looking forward to meeting the other teams, and hope it doesn't rain!
Wednesday, October 27, 2010
Convex Hull Generation in Blender
Convex hulls are very useful for a number of optimized calculations such as fast intersection tests, fast spatial subdivision, and other early-out's used in computer graphics, computational physics and robotics.
When I implemented convex hull generation and convex decomposition in PAL I first used qhull and leveraged code from tokamak physics, but then used code by Stan Melax and John Ratcliff for PAL. Recently my work at Transmin has required generation of a number of Convex hulls, and so I combined these snippets of old code to create a plug-in for Blender.
The Blender plugin creates a bounding convex hull of the selected object.
It calls an external executable 'convex' which creates a convex hull based on an intermediate OBJ file.
Installing the plugin requires you to compile the code to generate the 'convex' executable, and copying the python code into Blender's scripts directory.
To compile the C code on linux/osx:
Place the object_boundinghull.py script in your ".blender/scripts" directory.
On OSX Blender default installs to:
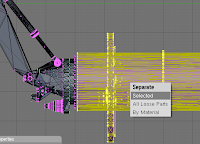 Once the plugin is installed you can start creating convex hulls. You can select an object in blender and cut it into smaller objects to manually decompose the hulls. To do this, you can use the Knife tool (K) or split objects in edit-mode with 'P'. (Selection tools like 'B' and manual alignment of cameras ('N', Numpad 5) will help a lot).
 Once you have the objects you would like to generate hulls for select one, and run the "Bounding Convex Hull" script. It will ask you to confirm the creation of the hull. The new hull will have the same name as the original object and have ".hull" appended to its name.
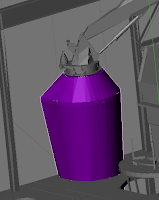
The plugin will generate a new object that represents the convex hull of the selected object, with the same transforms as the original object. (Ctrl-A to apply all down to the mesh, note: Blender 2.49 does not let you apply translation transforms, but Blender 2.5+ does). You can then decimate the hull to reduced the number of tri's used to represent your object. (Editing F9, under modifiers, select 'Add Modifier', decimate, and reduce the ratio).
Now your ready to export your scene for all your raytracing and collision detection needs!
Thanks to Transmin Pty Ltd for allowing me to release this plugin back to the Blender community under the GPL.
Follow the link to download the Blender Bounding Convex Hull plugin to generate editable bounding volumes directly in Blender.
When I implemented convex hull generation and convex decomposition in PAL I first used qhull and leveraged code from tokamak physics, but then used code by Stan Melax and John Ratcliff for PAL. Recently my work at Transmin has required generation of a number of Convex hulls, and so I combined these snippets of old code to create a plug-in for Blender.
The Blender plugin creates a bounding convex hull of the selected object.
It calls an external executable 'convex' which creates a convex hull based on an intermediate OBJ file.
Installing the plugin requires you to compile the code to generate the 'convex' executable, and copying the python code into Blender's scripts directory.
To compile the C code on linux/osx:
g++ createhull.cpp hull.cpp -o convex
Place the object_boundinghull.py script in your ".blender/scripts" directory.
On OSX Blender default installs to:
/Applications/blender-2.49b-OSX-10.5-py2.5-intel/blender.app/Contents/MacOS
 Once the plugin is installed you can start creating convex hulls. You can select an object in blender and cut it into smaller objects to manually decompose the hulls. To do this, you can use the Knife tool (K) or split objects in edit-mode with 'P'. (Selection tools like 'B' and manual alignment of cameras ('N', Numpad 5) will help a lot).
 Once you have the objects you would like to generate hulls for select one, and run the "Bounding Convex Hull" script. It will ask you to confirm the creation of the hull. The new hull will have the same name as the original object and have ".hull" appended to its name.
The plugin will generate a new object that represents the convex hull of the selected object, with the same transforms as the original object. (Ctrl-A to apply all down to the mesh, note: Blender 2.49 does not let you apply translation transforms, but Blender 2.5+ does). You can then decimate the hull to reduced the number of tri's used to represent your object. (Editing F9, under modifiers, select 'Add Modifier', decimate, and reduce the ratio).
Now your ready to export your scene for all your raytracing and collision detection needs!
Thanks to Transmin Pty Ltd for allowing me to release this plugin back to the Blender community under the GPL.
Follow the link to download the Blender Bounding Convex Hull plugin to generate editable bounding volumes directly in Blender.
Sunday, October 10, 2010
Using BZR

However, BZR has the advantage of being a distributed system and thus gives you the option of branching, working remotely (and still having version control), and then merging your changes back to the main trunk.
You can do this in a few easy steps:
- Make a copy of your code, by making a new "branch" of the code. Example:
(On LOCAL)
bzr branch WAMbot WAMbotAdriansBranch
In future, you can keep this branch up to date by using "bzr pull" from the branch.
- Copy the branch to your target (eg: a robot / embedded PC or usb-stick). If you copy from the USB stick to the target you will need an extra step to go back.
- Work with the source code on the target. After you have made changes just type "bzr commit" (on the target). This will commit to your local branch.
Now you have the advantage of being able to revert any changes that you make while working away, without needing a connection to the main server.
- If you copied from the USB stick, and you want to save the changes back to it, type (at the target): "bzr push LOCATION" (Where LOCATION is the USB disk drive). Example:
(On TARGET)
bzr push "e:/WAMbotAdriansBranch"
from the bzr directory on the robot.
- Now merge with your local repository, from your own bzr directory type:
bzr merge LOCATION (Where LOCATION is the USB disk drive, or shared folder) Example:(On LOCAL) bzr merge X:\WAMbotBranch
- Now you can commit them to the central server! (Just use bzr commit like always)
- bzr update (get the latest code from the server)
- bzr commit (save your code to the server)
- bzr add (add some files to repo)
- bzr whoami (get/set who you are)
- bzr revno (get current revision number)
- bzr diff -r REVISION (eg: 1000) filename (tells you the differences in a file since a specified revision)
There are a number of revision flags:
- bzr diff -r last:5 (compare with 5 revision ago)
- bzr diff -r date:yesterday (compare with yesterdays revision)
- bzr diff -r date:YYYY-MM-DD (compare with a dated revision)
- bzr diff -r last:5 (compare with 5 revision ago)
- bzr commit --local (commit to your own local repository, so you can easily undo changes. Note: you may need to bind/unbind, so branching as described above is probably better)
- bzr revert (undo your changes)
- bzr log (show commit comments)
- bzr log -r REVISION.. (show all comments since given revision. Example: "bzr log -r1000..")
Subscribe to:
Posts (Atom)


