Sunday, October 31, 2010

MAGIC 2010 - Adelaide

We are off to Adelaide for the MAGIC 2010 finals.
Looking forward to meeting the other teams, and hope it doesn't rain!

Wednesday, October 27, 2010

Convex Hull Generation in Blender

Convex hulls are very useful for a number of optimized calculations such as fast intersection tests, fast spatial subdivision, and other early-out's used in computer graphics, computational physics and robotics.

When I implemented convex hull generation and convex decomposition in PAL I first used qhull and leveraged code from tokamak physics, but then used code by Stan Melax and John Ratcliff for PAL. Recently my work at Transmin has required generation of a number of Convex hulls, and so I combined these snippets of old code to create a plug-in for Blender.

The Blender plugin creates a bounding convex hull of the selected object.
It calls an external executable 'convex' which creates a convex hull based on an intermediate OBJ file.

Installing the plugin requires you to compile the code to generate the 'convex' executable, and copying the python code into Blender's scripts directory.

To compile the C code on linux/osx:
g++ createhull.cpp hull.cpp -o convex

Place the object_boundinghull.py script in your ".blender/scripts" directory.

On OSX Blender default installs to:
/Applications/blender-2.49b-OSX-10.5-py2.5-intel/blender.app/Contents/MacOS
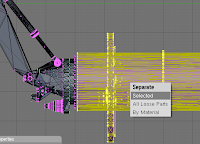
Once the plugin is installed you can start creating convex hulls. You can select an object in blender and cut it into smaller objects to manually decompose the hulls. To do this, you can use the Knife tool (K) or split objects in edit-mode with 'P'. (Selection tools like 'B' and manual alignment of cameras ('N', Numpad 5) will help a lot).
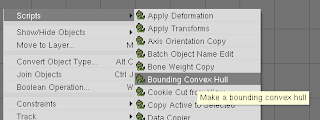
Once you have the objects you would like to generate hulls for select one, and run the "Bounding Convex Hull" script. It will ask you to confirm the creation of the hull. The new hull will have the same name as the original object and have ".hull" appended to its name.
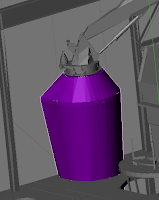
The plugin will generate a new object that represents the convex hull of the selected object, with the same transforms as the original object. (Ctrl-A to apply all down to the mesh, note: Blender 2.49 does not let you apply translation transforms, but Blender 2.5+ does). You can then decimate the hull to reduced the number of tri's used to represent your object. (Editing F9, under modifiers, select 'Add Modifier', decimate, and reduce the ratio).


Now your ready to export your scene for all your raytracing and collision detection needs!

Thanks to Transmin Pty Ltd for allowing me to release this plugin back to the Blender community under the GPL.

Follow the link to download the Blender Bounding Convex Hull plugin to generate editable bounding volumes directly in Blender.

Sunday, October 10, 2010

Using BZR

BZR supports a number of different workflows. The most common one is "Centralized", which allows you to use BZR just like CVS or SVN. You just type "bzr commit" (save changes) and "bzr update" (get changes).

However, BZR has the advantage of being a distributed system and thus gives you the option of branching, working remotely (and still having version control), and then merging your changes back to the main trunk.

You can do this in a few easy steps:
  1. Make a copy of your code, by making a new "branch" of the code. Example:
    (On LOCAL)
    bzr branch WAMbot WAMbotAdriansBranch
    
    In future, you can keep this branch up to date by using "bzr pull" from the branch.
  2. Copy the branch to your target (eg: a robot / embedded PC or usb-stick). If you copy from the USB stick to the target you will need an extra step to go back.
  3. Work with the source code on the target. After you have made changes just type "bzr commit" (on the target). This will commit to your local branch.

    Now you have the advantage of being able to revert any changes that you make while working away, without needing a connection to the main server.
  4. If you copied from the USB stick, and you want to save the changes back to it, type (at the target): "bzr push LOCATION" (Where LOCATION is the USB disk drive). Example:
    (On TARGET)
    bzr push "e:/WAMbotAdriansBranch"
    
    from the bzr directory on the robot.
  5. Now merge with your local repository, from your own bzr directory type:
    bzr merge LOCATION (Where LOCATION is the USB disk drive, or shared folder) Example:
    (On LOCAL)
    bzr merge X:\WAMbotBranch
    
  6. Now you can commit them to the central server! (Just use bzr commit like always)
This saves you from having to keep track of your source code and merge things manually. Some more helpful BZR tips:
  • bzr update (get the latest code from the server)
  • bzr commit (save your code to the server)
  • bzr add (add some files to repo)
  • bzr whoami (get/set who you are)
  • bzr revno (get current revision number)
  • bzr diff -r REVISION (eg: 1000) filename (tells you the differences in a file since a specified revision)

    There are a number of revision flags:
    • bzr diff -r last:5 (compare with 5 revision ago)
    • bzr diff -r date:yesterday (compare with yesterdays revision)
    • bzr diff -r date:YYYY-MM-DD (compare with a dated revision)
  • bzr commit --local (commit to your own local repository, so you can easily undo changes. Note: you may need to bind/unbind, so branching as described above is probably better)
  • bzr revert (undo your changes)
  • bzr log (show commit comments)
  • bzr log -r REVISION.. (show all comments since given revision. Example: "bzr log -r1000..")
BZR also has a number of plugins, including one to run a command before a commit.

Friday, September 24, 2010

Circular Motion in 2D for graphics and robotics

For a number of applications circular motion in 2D is useful, in particular simplified kinematic representations for mobile robot simulation and control. There are a number of different ways of representing this motion.

First it is helpful to remember a position on a circle can be described parametrically by:
[x,y] = [r*cos(theta), r*sin(theta)]
or alternatively, r =sqrt( x^2 + y^2).

  1. As a circular variation of the standard 2D particle, we just add an angular velocity (omega) and angular orientation (theta). For a standard 2D particle we can describe its velocity (v) in terms of acceleration (a) and a delta in time (dt) (v += a*dt; x+= v*dt). We can modify this to include the parametric circle representation:

    theta += omega * dt;
    x+=v*dt*cos(theta);
    y+=v*dt*sin(theta);
    
  2. The problem with the above method is that it is in-exact and relies on an integrator. The 2D velocity/angular velocity representation can easily be fully solved analytically. The radius of a circle produced by a given velocity (v) and angular velocity (omega, or w) is:
    r = | v / w |
    We can modify the parametric representation to include an offset for the centre of motion:
    [x,y] = [r*cos(theta) + xc, r*sin(theta) + yc]
    Thus, given an initial x,y,theta we can find the centre of the circle of motion as:

    xc = x - (v/w)*sin(theta)
    yc = y + (v/w)*cos(theta)
    
    Now we can update the position of the robot:

    theta += w * dt;
    x = xc + (v/w) sin(theta)
    y = yc - (v/w) cos(theta)
    
    We can expand this into a single line as:

    x+= -(v/w)*sin(theta) + (v/w)*sin(theta+w*dt)
    y+= -(v/w)*cos(theta) - (v/w)*cos(theta+w*dt)
    theta += omega * dt;
    
    Which is the form many robotics papers use.
  3. Finally, we may wish to represent the motion in terms of two given x,y coordinates and solve for the translation and rotation required to reach them (as is the case for odometry calculations). In this case, we can represent any movement from an original set of coordinates [x,y,theta] to a new set [x',y',theta'] as first a rotation and translation to bring you to any new x' and y', followed by another rotation to bring you to the final theta'. Using triangle trigonometry this is:

    deltaRot1 = atan2(y'-y,x'-x) - theta
    deltaTrans = sqrt( (x-x')^2 + (y-y')^2 )
    deltaRot2 = theta' - theta - deltaRot1 
    
There are of course many more ways of representing circular motion, but the above are the most common in computer graphics and robotics.

Tuesday, September 14, 2010

Intel Compiler on Linux

  • Make sure you have access to root. (eg: sudo su root, passwd)
  • Make sure you have your build environment set up. eg:

    sudo apt-get install gcc
    sudo apt-get install build-essential
    sudo apt-get install g++
    sudo apt-get install rpm
    
  • ICC requires older standard C libraries, libstdc++5, so you can get them for Ubuntu from:
    Package: libstdc++5. You just need to download the i386 package. (eg from the Australian mirror, by using wget [url]), and then install it, eg: "sudo dpkg -i libstdc++5_3.3.6-18_i386.deb".
    If you don't do this you may get the following error messages:

    Missing critical pre-requisite
    -- missing system commands
    
    The following required for installation commands are missing:
    libstdc++.so.5 ( library)
    
  • Download ICC
  • Unzip (tar -xvf filename)
  • ./install.sh
  • Choose to install for all (1)
  • Read "welcome" message follow instructions for licence, etc.
  • Activate your software (1) and provide the serial number that came in your email. You should see "Activation Completed Successfully"
  • Install the software (requires 3.35 gigs). You should see a message "Checking the prerequisites. It can take several minutes. Please wait…".
  • You might see:

    Missing optional pre-requisite
    -- No compatible Java* Runtime Environment (JRE) found
    -- operating system type is not supported.
    -- system glibc or kernel version not supported or not detectable
    -- binutils version not supported or not detectable
    
    The JRE you need for the visual debugger, otherwise you can safely continue.
  • The installer then asks which components to install, eg "Intel(R) C++ Compiler Professional Edition for Linux*", just press "1. Install" to continue. It should state "component installed successfully."
  • Setup the paths, you can use the iccvars.sh in /opt/intel/Compiler/11.1/073/bin to setup everything for you. (eg: source /opt/intel/Compiler/11.1/073/bin/iccvars.sh ia32). You may wish to put it into your .bashrc file.
  • That's it! Type "icc" to invoke for C files or "icpc" for C++ files. For standard makefiles use "make CXX=icpc"
On a 1GHz VIA Esther processor, GCC 4.4.1, with -O2 -march=c3-2:
real 0m16.855s
user 0m16.849s
sys 0m0.004s
And, with ICC 11.1, with -O2:
real 0m11.369s
user 0m11.361s
sys 0m0.008s

An instant 45% speedup! Unfortunately not all code makes such a big change, some other compute-intensive code I tested only got a 4% speedup. In any case I'd say its worth it!

Sunday, September 12, 2010

SIGGRAPH 2010 Course Papers Overview

I've managed to work through the SIGGRAPH 2010 course content that relates to realtime rendering. I quite liked the Toy Story 3 rendering techniques and realtime rendering survey by nVidia- just because they give a nice overview. As always, there are a number of great presentations, and I've listed the ones that I found interesting below.
  • Toy Story 3 : The Video Game Rendering Techniques from Avalanche Software gives a great (211 page!) overview of a number of lighting issues for the game including SSAO (various optimizations/approximations for how/where to sample, faking more samples and dealing with large differences in depth), ambient lighting (without needing to bake it or do GI) and various aspects on shadows. A great read!
  • Surveying Real-Time Rendering Algorithms by David Luebke from nVidia gives an excellent short overview of a number of recent developments in realtime rendering algorithms including stochastic transparency (ie : transparency via random sampling), sample distribution for shadow maps (partitioning the scene in light-space), alias-free shadow maps, append-consume order-independent-transparency (sorting per-pixel & linked-lists), progressive photon mapping, image-space photon mapping, ambient occlusion volumes (how to speed it up with bitwise occlusion mask for each triangle - one per edge, and one for the triangle plane), stochastic rasterization (of 4d triangles)
  • Keeping Many Cores Busy: Scheduling the Graphics Pipeline by Jonathan Ragan-Kelly from MIT gives a great overview of the graphics pipeline stages (from Input Assembler, Vertex Shader, Primitive Assembler, Tesselation, Geometry Shader, Rasterizer, Pixel Shader, and finally Output Blending) and load balancing.
  • Uncharted 2 - Character Lighting and Shading by John Hable from Naughty Dog gives a fabulous overview of rendering issues with skin (in a lot of detail!), hair and clothes.
  • Bending the Graphics Pipeline by Johan Andersson from DICE describes tile-based deferred shading (for GPU and SPU), morphological antialiasing and analytical ambient occlusion.
  • A real-time Radiosity Architecture for Video Games by Sam Martin and Per Einarsson from DICE/Geomerics introduce the 'Enlighten' system for realtime GI - it gives a nice overview.
  • Evolving the Direct3D Pipeline for Real-­time Micropolygon Rendering by Kayvon Fatahalian from Stanford University gives an interesting insight on Micropolygon rendering on current GPU pipelines.
  • Water Flow in Portal 2 by Alex Vlachos - I've already written about this previously, just another realtime technique for faking the simulation and rendering of water flow.
  • Making Concept Real For Borderlands by Gearbox Software contains some nice examples of their concept art, the development change from photorealistic to stylistic rendering and art (and the code/artist balance), and the sobel edge filter they used.
  • The notes from the volumetric course was broken into parts:

    1. "Resolution Independent Volumes" - which describes the "Field Expression Language Toolkit", cloud modelling (via density displacement), morphing objects (by using the Nacelle Algorithm to generate warp fields), cutting models, fluid dynamics, gridless advection, and semi-lagrangian mapping (balancing between grids and non-grids).
    2. "Mantra Volume Rendering" - this describes the volume rendering engine for Houdini.
    3. "Volumetric Modeling and Rendering" describes the volumetrics library/API developed at Dreamworks.
    4. "Double Negative Renderer B" (used in Batman Begins, Harry Potter, etc.) describes the workflow and various shaders (Fluid, Particle, Voxel, Fire, Smoke) in DNB
    5. "Volume Rendering at Sony Pictures Imageworks". The section from Sony Imageworks included an overview of their pipeline and content on their open source field/fluid tools.

Wednesday, September 08, 2010

Catchup Post: Graphics & GPU's & Physics

A long overdue catchup post for various interesting things I've spotted over the last two or three months. SIGGRAPH recently finished, so it really deserves a round-up, although I haven't had time to review all the interesting things.
The annual tutorial on
realtime collision had some interesting presentations, I quite liked the one from Erwin Coumans (Bullet) this year - it gives a good overview of the recent advances in the Bullet engine including the GPU optimizations. Simon Green also has a presentation on CUDA SPH rendering (also see Jihun Yu's particle fluid surface reconstruction) and another open source GPU SPH simulation from HPC lab.
The realtime graphics tutorial, stylized rendering, volumetrics, and programmable shaders has some great stuff that I'll look into in more detail in a future post. Ofcourse there is also always the SIGGRAPH 2010 papers list, and SIGGRAPH asia papers (again more on this later..).

Some GPGPU software/links:
and MPTL is a parallel version of the STL algorithms.


Some physics links:
Some graphics links:
And finally a documentary on the history of the Future Crew demo group and Second Reality. Brings back the memories.